
For exploring docs like code, I decided to use Visual Studio Code as the editor for writing content in markdown. The main reasons for that decision are:
It’s free
You can use it to write markdown files and it shows an HTML preview.
You can connect it to GitHub
It has a user interface with options that you can use to perform many of the git commands instead of using command lines. Personally, I prefer that as I struggle to remember the git command terms and syntax. I find selecting them as options is much easier.
It’s a tool that developer’s use and that can be seen as a bonus when looking for work (so I’m told).
Note: This is all a learning curve, so it could turn out that I’ll discover flaws with VSC and find another tool I prefer to use. Let’s see how it all pans out.
In this post, I’ll explain how to install Visual Studio Code and set it up to work with GitHub. If you’re not using Visual Studio Code, I’ll include the git commands that you can use in terminal/command prompt instead.
Step 1. Install Visual Studio Code or an editor
To create your content, you’ll use a text editor of some sort. For learning about docs like code, I used a free product called Microsoft Visual Studio Code, which is a developer too. A technical writer who is also a developer advised me to try using it because:
You can use it to write markdown files and it shows an HTML preview.
You can connect it to GitHub
It has a user interface with options that you can use to perform many of the git commands instead of using command lines. Personally, I prefer that as I struggle to remember the git command terms and syntax. I find selecting them as options is much easier.
It’s a tool that developer’s use and that can be seen as a bonus when looking for work.
You can install it for Mac or Windows from the official site: https://code.visualstudio.com/Download
If you prefer, you can use any text editor that supports the file type you are going to be using (likely markdown).
Step 2. Install Git
Git is the software that:
Tracks changes to files in a specific folder on your computer (called a repository, often shortened to “repo”)
Gives you access to git commands you can use for version control, collaboration, and managing file history.
On macOS
If you’re using a Mac, git is usually already installed. An easy way to check is to do this:
Press Cmd+Space to open spotlight search.
Search for “Terminal.app" on your computer.
Open Terminal.app.
Enter:
git --versionPress Enter. If git is installed, you should see something like:
git version 2.39.5 (Apple Git-154)If you don’t have git installed, macOS will prompt you to install the Xcode Command Line Tools, which include Git. Select Install.
On Windows
On Windows, you will need to install git yourself:
Download git from the official site https://git-scm.com/downloads/win.
Run the downloaded .exe file.
At the prompt, select Yes to give git access to make changes to your device.
Go through the installation wizard and use the default settings apart from:
Default editor - change to the editor you are going to use. In my posts, I’m going to describe using Visual Studio Code as the editor, so I would choose that as the default editor.
PATH environment - choose Use Git from Git Bash only. Git Bash is a terminal emulator that works in a similar way to Terminal on macOS. It supports more commands than Windows Command Prompt.
Finish the install.
Run Git Bash.
Enter:
git --versionPress Enter. If git is installed, you should see something like:
git version 2.43.0.windows.1
Step 3. Create a GitHub account
GitHub is an online platform where you can store your repositories in the cloud, collaborate with others, and track changes to your files.
Go to https://github.com.
Select Sign up.
Follow the steps to create a free account by providing a username, email, and password.
Once you’ve signed up and logged in, you’re ready to create repositories.
Step 4. Create a repository
To create a new repository on GitHub:
-
Log in to GitHub.
-
Select the + icon and select New repository.
-
Give your repository a name, for example: technical-docs. You can also add a description (optional).

-
Choose Public (anyone can see it) or Private (only you and invited collaborators can see it).

-
Check the box to add a README file. It is good practice to add information about the project in a README file (you can add the information later in the editor).

-
Choose a .gitignore file (optional).
A .gitignore file tells git which files or folders it should not track in your repository. I usually leave this set to the default of .gitignore template:None. If you do need to stop git from tracking certain files or folders, you can find out more about ignore files in the official GitHub docs. -
Choose a license (optional).
This is about who can legally edit, distribute or reuse the content in your repo. None is the most restrictive and effectively gives the public read only permission. That’s the only option I’ve used so far. You can find out more about licences in the GitHub documentation. -
Select Create repository.
You now have a repo in the cloud (GitHub) for containing tracked content.

The next step is to get a copy of that repo on to your local machine so that Git can sync your local version with the version in GitHub. The copy process is called “cloning”.
Step 5. Clone your repo
As you don’t have a local repository yet, the easiest way to get started is to clone the empty repository you created on GitHub. Cloning means you’re copying a repo (even if it’s empty) from GitHub to your local machine so that you have a local version you can work from.
Clone your repo in VS Code
-
Copy the URL of your GitHub repository:
i. Go to your GitHub repo page.
ii. Select the green Code button.
iii. Copy the URL shown under HTTPS.
Note: HTTPS only applies if you are going to use 1 GitHub account with your Visual Studio Code. If you are going to use multiple accounts, use the SSH option. That will need some setting up locally, and it gets a bit tricky. I used ChatGPT to guide me through it.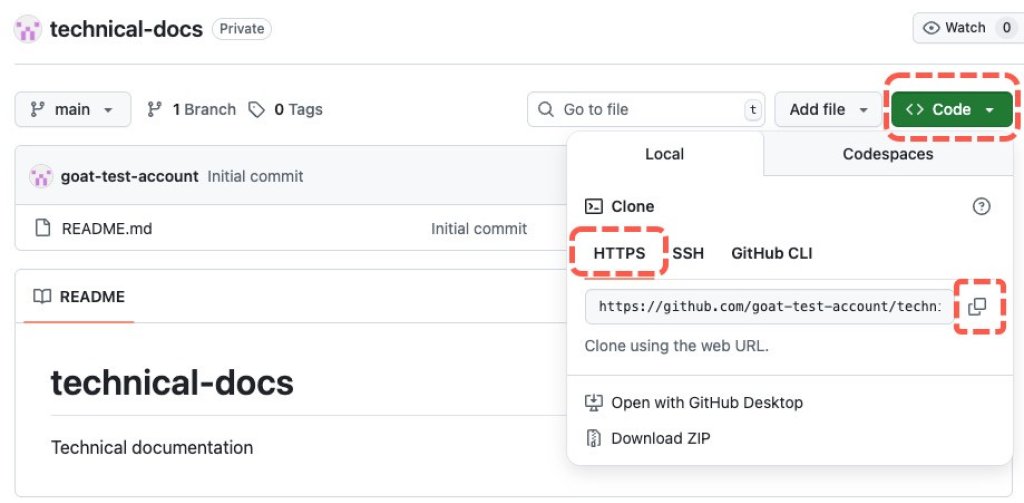
-
Open Visual Studio Code.
-
Sign in to VSC.
Note: You need to sign in using the same account that has access to your repo on GitHub. If you have been signed in to VSC under a different account, you will need to sign that out completely first (easier said than done sometimes! You can find information about signing in and out in the official docs. -
Either select Clone Git Repository on the Welcome page or:
i. Open the Command Palette. Press Cmd + Shift + P (Mac), Ctrl + Shift + P (Windows)
ii. Type and select Git: Clone.
iii. Paste the URL of your GitHub repository.

-
Choose a folder on your computer where you want to save this repo. You can add a new folder if you like. Use Select as Repository Destination to confirm your choice.
VS Code will download (clone) the repo to that folder.
-
When prompted, click Open to open the folder in Visual Studio Code.
Clone your repo using terminal or command line
If you're not using VS Code and want to clone a GitHub repo using just the command line:
Open your terminal (Mac/Linux) or Command Prompt / PowerShell (Windows).
Navigate to the folder where you want the repo to be copied. For example:
cd <path to folder for your local repo>Run the
git clonecommand with the repo URL, for example:git clone git@github.com:username/repository.gitNote: For HTTPS:, use:
git clone https://github.com/username/repository.git
What happens when you clone?
A local copy of the remote repository is created on your computer, including the
.gitfolder, which holds all version history and configuration.The default branch (usually
main) is automatically selected and set up to sync with its counterpart on the remote repository.You now have a local git repository that’s connected to the GitHub repository.
Can you start writing now? Well, you could, but it would mean you are working in the main version of the content in your local repo. That’s generally seen as a bad idea, especially if you are working in a team. The main version is the published version that has presumably been reviewed and proven to be correct. So it’s usually better to leave that version alone and make your changes in a separate version, called a branch. I’ll cover that in the next post: Create a branch.
